Personal mobile radio application using Ionic
Hi, there!
Finally I am tired because of all advertisements which we have in any simple radio mobile application. I just want to listen radio and that is all! Quite simple, hah?
So I decided to create a simple radio mobile application by myself. I thought about Xamarin as I have some experience in creating application using it. But I decided to use new framework for me and it is Ionic. I am very impressed how cool it is and how easy to create application using it. It took about 2 hours to install all dependencies (ionic, android studio, java), deploy and run a first version of my application on my android device. Quite fast!
I am using Ubuntu 16.04.
Please find the steps below:
- I have installed ionic framework using this link and create blank application:
ionic start radioOn blank. - And that is all, to start our application need to run
ionic serve. - As I want to listen an online radio, I need to create a provider to listen online stream: Html5Audio:
import { Injectable, Output, EventEmitter } from '@angular/core';

@Injectable()
export class Html5Audio {
    @Output()
    ended = new EventEmitter();

    private pad2(number) { (number < 10 ? '0' : '') + number; }

    audioPlayer: any;
    time: string;
    @Output()
    isPlaying = false;
    readyStateInterval = null;
    url: string;

    public play(url: string) {
        if (this.audioPlayer) {
            this.stop();
        }
        this.url = url;
        this.audioPlayer = new Audio(this.url);
        this.isPlaying = true;
        this.audioPlayer.play();

        this.audioPlayer.addEventListener("timeupdate", () => {
            if (this.audioPlayer) {
                var s = this.audioPlayer.currentTime % 60;
                var m = (this.audioPlayer.currentTime / 60) % 60;
                var h = ((this.audioPlayer.currentTime / 60) / 60) % 60;
                if (this.isPlaying && this.audioPlayer.currentTime > 0) {
                    this.time = this.pad2(h) + ':' + this.pad2(m) + ':' + this.pad2(s);
                }
            }
        }, false);
        this.audioPlayer.addEventListener("error", (ex) => {
            console.error(ex);
        }, false);
        this.audioPlayer.addEventListener("canplay", () => {
            console.log('CAN PLAY');
        }, false);
        this.audioPlayer.addEventListener("waiting", () => {
            this.isPlaying = false;
        }, false);
        this.audioPlayer.addEventListener("playing", () => {
            this.isPlaying = true;
        }, false);
        this.audioPlayer.addEventListener("ended", () => {
            this.stop();
            this.ended.emit();
        }, false);
    }

    pause() {
        this.isPlaying = false;
        this.audioPlayer.pause();
    }

    stop() {
        this.isPlaying = false;
        this.audioPlayer.pause();
        this.audioPlayer = null;
    }
}
- It has been imported to /src/app/app.module.
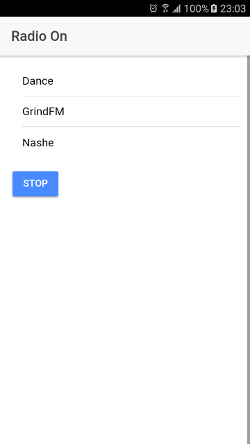
- There is only one page with a list of stations (I have only 3 which I listen). Click on a station - starting this station, and there is one button to stop music(link). That is all. Simple!
- After that we need to prepare icon and splash image for application. I am using game-icons to create an icon and unspalsh to find full size images.
- Need to put created icon.png and splash.png to /resources/icon.png and /resources/splash.png and run the next command
ionic cordova resources(you have to have an account in Ionic portal and it is free). - To deploy our application need to run
ionic cordova build android --prod --releaseand it will create *.apk file. We need to sign it using 'Sign Android APK' section from here. - That is all. We have signed apk which we can copy on our device and install.
Please find my project here. Signed apk file here.
How it looks like:

Cheers,